SAML SPをつくろう 【mod_auth_mellon編】

schedule 2018/12/28  refresh 2023/11/08


目的

mod_auth_mellonを使用してSAML Service Provider (SAML SP)を構築しSeciossLinkからSSOを実現する。


前提

CentOS 7.6 のインストールと初期設定が完了していること

SeciossLinkが利用可能であること(こちらから申し込みできます。)
検証用のSeciossLinkテナントは example.com とします。


構築手順


1.環境設定

CentOSにmod_auth_mellonと必要なモジュールをインストールします。


# yum install mod_auth_mellon
# yum install mod_ssl
# yum install mod_php

※ mod_php は テストページ用にインストールします。


2.SAML SP設定ファイルの作成

SAMLメタデータ用のディレクトリとメタデータを作成します。
SAML SPエンティティIDを https://centos76.int.secioss.work/samlsp
エンドポイントを https://centos76.int.secioss.work/mellon とします。


# mkdir /etc/httpd/metadata
# cd /etc/httpd/metadata
# /usr/libexec/mod_auth_mellon/mellon_create_metadata.sh https://centos76.int.secioss.work/samlsp https://centos76.int.secioss.work/mellon


コマンドを実行すると、SAMLで使う証明書やメタデータのファイル名とエンドポイントのURLが出力されます。
これらの値は httpd の設定ファイルやSeciossLinkの設定時に使うのでメモしておきます。


Output files:
Private key: https_centos_.int.secioss.work_samlsp.key
Certificate: https_centos_.int.secioss.work_samlsp.cert
Metadata: https_centos_.int.secioss.work_samlsp.xml
Host: centos76.int.secioss.work

Endpoints:
SingleLogoutService (SOAP): https://centos76.int.secioss.work/mellon/logout
SingleLogoutService (HTTP-Redirect): https://centos76.int.secioss.work/mellon/logout
AssertionConsumerService (HTTP-POST): https://centos76.int.secioss.work/mellon/postResponse
AssertionConsumerService (HTTP-Artifact): https://centos76.int.secioss.work/mellon/artifactResponse
AssertionConsumerService (PAOS): https://centos76.int.secioss.work/mellon/paosResponse


SAML IDPメタデータをダウンロードします。
(クエリーストリングのtenantにはテナントIDを設定してください。)


# cd /etc/httpd/metadata/
# wget --content-disposition https://slink.secioss.com/saml/metadata.php?tenant=example.com


3.Apache httpdの設定

作成した メタデータなどを httpd の設定ファイルに設定します。
メタデータと証明書のファイル名は「2.」で出力した値を使用します。


# vi /etc/httpd/conf.d/mellon.conf


<Location />
MellonEndpointPath "/mellon"
MellonIdPMetadataFile /etc/httpd/metadata/SlinkMetadata.xml
MellonSPPrivateKeyFile /etc/httpd/metadata/https_centos_.int.secioss.work_samlsp.key
MellonSPCertFile /etc/httpd/metadata/https_centos_.int.secioss.work_samlsp.cert
MellonSPMetadataFile /etc/httpd/metadata/https_centos_.int.secioss.work_samlsp.xml
</Location>

<Location /mellon>
AuthType "Mellon"
Require valid-user
MellonEnable "auth"
</Locationn>

Alias /app /var/www/app
<Location /app>
AuthType "Mellon"
Require valid-user
MellonEnable "auth"
</Location>

※ /app はテストページのパスです。


httpd を起動します。


# systemctl start httpd


必要でしたらファイアーウォールで通信を許可してください。


# firewall-cmd --permanent --zone=public --add-service=https
# firewall-cmd --reload


4.SeciossLinkの設定

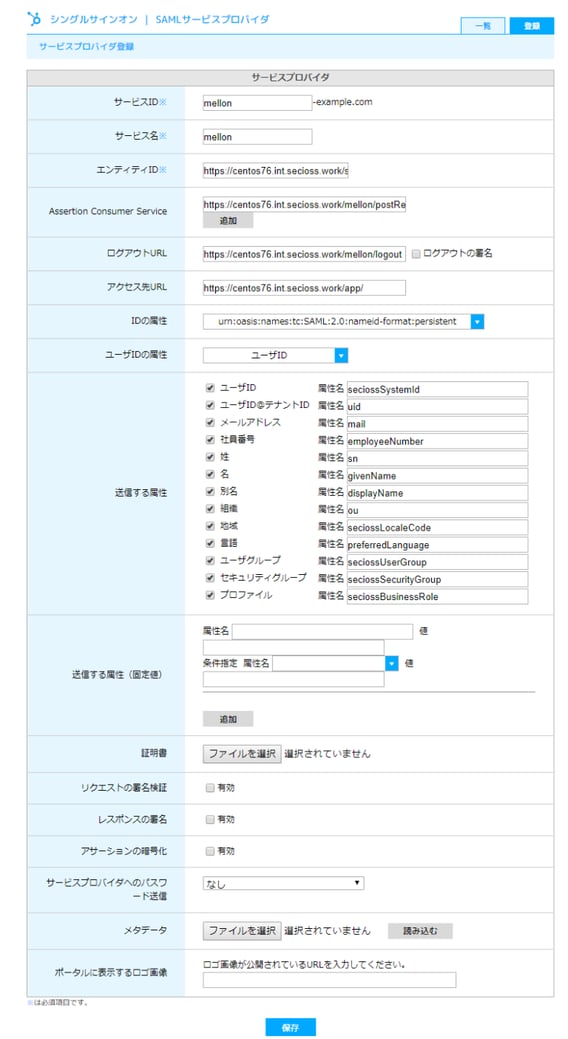
SeciossLinkの管理画面にログインし、SAML SPの新規登録を行います。


20181228_1


項目名

設定値

サービスID mellon  ※任意の値
サービス名 mellon  ※任意の値
エンティティID https://centos76.int.secioss.work/samlsp
※SAML SPメタデータ設定時に使用した値を設定します
Assertion Consumer Service https://centos76.int.secioss.work/mellon/postResponse
※SAML SPエンドポイントのURLを設定します
ログアウトURL https://centos76.int.secioss.work/mellon/logout
※SAML SPエンドポイントのURLを設定します
アクセス先URL https://centos76.int.secioss.work/app/
※テストページのURLを設定します
IDの属性 urn:oasis:names:tc:SAML:2.0:nameid-format:persistent


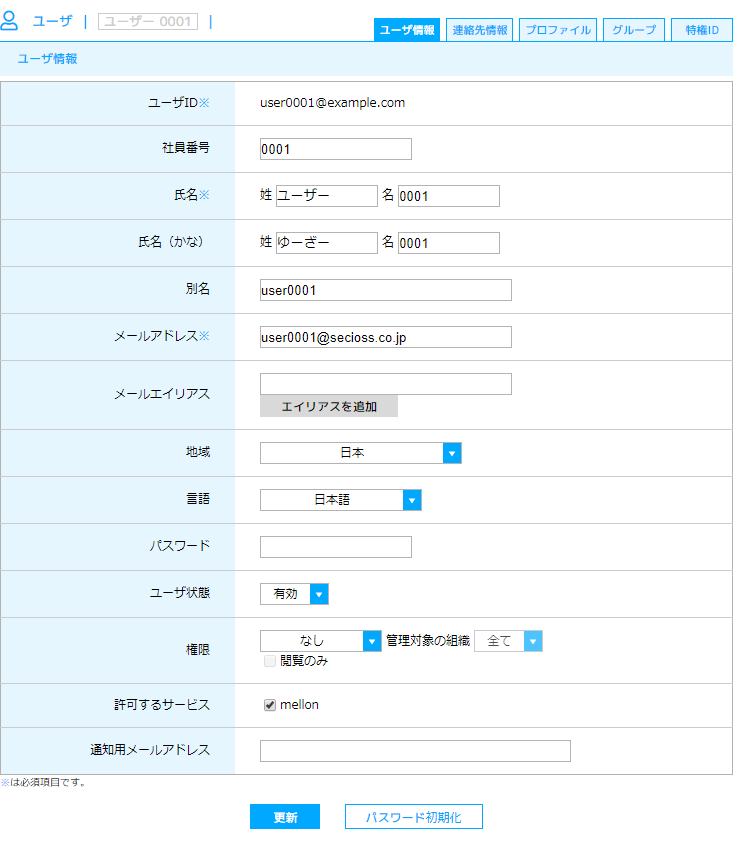
登録したSAML SPをユーザーに割り当てます。


20181228_2


5.動作確認

テスト用ページの作成します。


# vi /var/www/app/index.php


<html>
<body>
<h1>こんにちは <?php print getenv('MELLON_NAME_ID') ?> さん</h1>
<body>
</html>


mod_auth_mellonで認証後、ユーザIDはApache環境変数の MELLON_NAME_ID に設定されているので、それを表示しています。


ブラウザでアクセスURLにアクセスすると、SeciossLinkのログイン画面にリダイレクトされ、
ログインすると以下のような画面が表示されます。


https://centos76.int.secioss.work/app/


SimpleSAMLphpを使ってSAMLに対応したサイトを作ろう-6


このようにmod_auth_mellonを使うと簡単にSAML対応のWebサイトを簡単に構築できます。


それではまた。