Shibboleth SP for IIS でSAML対応

schedule 2019/07/05  refresh 2024/02/01

目的

Shibboleth SP for IIS を使用して SAML に対応した ASP.NET のサイトを作ります。


前提

SeciossLinkが利用可能であること(こちらから申し込みできます。)
検証用のSeciossLinkテナントは example.com とします


Windows Server 2019(以下 Win2019) が構築済みであること
ホスト名は shibbolethiis.int.secioss.work とします。


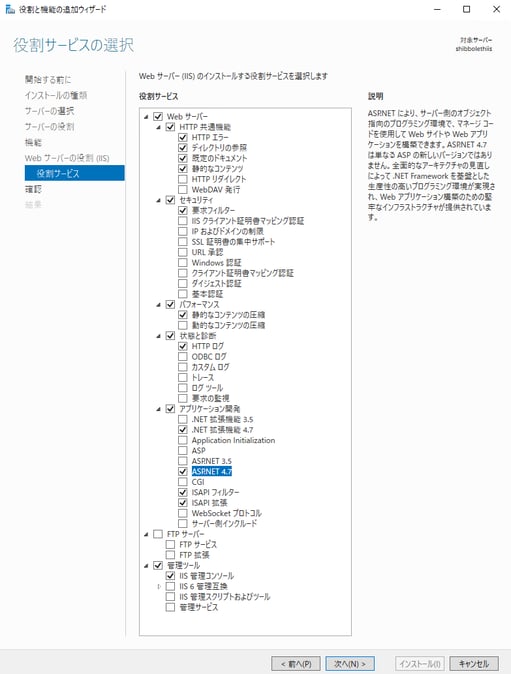
Win2019 に Webサーバー(IISとASP.NET、ISAPI)の役割がインストール済みであること


20190705_1


構築手順

1.Shibboleth SP for Windows のインストール


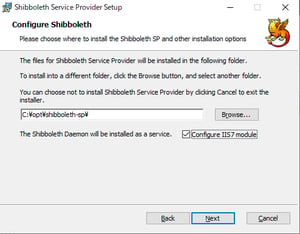
Shibboleth公式サイトから Shibboleth SP forWindows をインストールします。

https://shibboleth.net/downloads/service-provider/3.0.4/win64/shibboleth-sp-3.0.4.1-win64.msi


今回は執筆時点の最新版(3.0.4)をインストールします。


インストールパス指定画面で「Configure IIS7 module」にチェックを入れます。
それ以外はすべてデフォルトでインストールします。


20190705_2


インストール後、再起動を求められましたら、再起動をしてください。


2.SeciossLink の メタデータ


SeciossLink の SAML IDP メタデータをダウンロードします。


QueryStringのexample.comはテナント名なので、環境に合わせて変えてください。

https://slink.secioss.com/saml/metadata.php?tenant=example.com


ダウンロードした SlinkMetadata.xml は Shibboleth の設定ファイルのフォルダーに配置します。

C:\opt\shibboleth-sp\etc\shibboleth\SlinkMetadata.xml


3.Shbboleth SP の設定

Shibboleth SPの設定ファイルを設定していきます。


デフォルトでは C:\opt\shibboleth-sp\etc\shibboleth\shibboleth2.xml にインストールされているファイルを編集します。


今回構築するホスト名は


・Webサーバーのホスト名を設定します。

        
<InProcess>
  <ISAPI normalizeRequest="true" safeHeaderNames="true">
    <!--
      Maps IIS Instance ID values to the host scheme/name/port. The name is
      required so that the proper <Host> in the request map above is found without
      having to cover every possible DNS/IP combination the user might enter.
    -->
    <Site id="1" name="shibbolethiis.int.secioss.work"/>
    <!--
      When the port and scheme are omitted, the HTTP request's port and scheme are used.
      If these are wrong because of virtualization, they can be explicitly set here to
      ensure proper redirect generation.
    -->
    <!--
      <Site id="42" name="virtual.example.org" scheme="https" port="443"/>
    -->
  </ISAPI>
</InProcess>


・Shibboleth SPで認証が必要なホストとパスを設定します。


今回、パスはデフォルトの secure をそのまま使用します。

        
<RequestMapper type="Native">
    <RequestMap>
      <!--
      The example requires a session for documents in /secure on the containing host with http and
      https on the default ports. Note that the name and port in the <Host> elements MUST match
      Apache's ServerName and Port directives or the IIS Site name in the <ISAPI> element above.
      -->
      <Host name="shibbolethiis.int.secioss.work">
        <Path name="secure" authType="shibboleth" requireSession="true"/>
      </Host>
      <!-- Example of a second vhost mapped to a different applicationId. -->
      <!--
      <Host name="admin.example.org" applicationId="admin" authType="shibboleth" requireSession="true"/>
      -->
    </RequestMap>
</RequestMapper>


・Shibboleth SPのentityIDを設定します。

任意の文字列でいいのですが、慣習に従いurl形式とします。

        
<ApplicationDefaults entityID="https://shibbolethiis.int.secioss.work/shibboleth"
    REMOTE_USER="eppn subject-id pairwise-id persistent-id"
    cipherSuites="DEFAULT:!EXP:!LOW:!aNULL:!eNULL:!DES:!IDEA:!SEED:!RC4:!3DES:!kRSA:!SSLv2:!SSLv3:!TLSv1:!TLSv1.1">


・SeciossLink(ID Provider)のentityIDを設定します


SeciossLinkのentityIDにはテナントIDが含まれているため、テナント毎に違う値です。
今回は example.com を使用しているので、以下のようになります。


今回 discoveryProtocol は使用しないので、デフォルトのまま変更しません。

        
<SSO entityID="https://slink.secioss.com/example.com"
        discoveryProtocol="SAMLDS" discoveryURL="https://ds.example.org/DS/WAYF">
       SAML2
      </SSO>


・Shibboleth SPのステータス確認ページのACL


Shibbolethの動作確認用ページに、LAN内の別PCからもアクセスできるようにACLを追加しときます。
動作確認だけなので不要ならスキップしても大丈夫です。

        
<Handler type="Status" Location="/Status" acl="127.0.0.1 192.168.0.0/16 ::1"/>


・SeciossLinkのメタデータを設定します。


デフォルトではコメントアウトされていますので、アンコメントして。pathを書き換えます。
「2.SeciossLink の メタデータ」 でダウンロードしたファイルを指定します。

        
<MetadataProvider type="XML" validate="true" path="SlinkMetadata.xml"/>


・Shibboleth SPの再起動


これでShibboleth SPの設定は終了です。Shibboleth SPのサービスを再起動します。

        
net stop Shibd_Default
net start Shibd_Default


4.IISの設定

「C:\opt\shibboleth-sp」フォルダーにIIS_IUSRSのフルコントロール権限を付与します。


エクスプローラーから 「C:\opt\shibboleth-sp」を選択し、右クリックのコンテキストメニューから「プロパティ」を選択します。


20190705_3


セキュリティ タブを開き、「編集」ボタンを押下します。


20190705_4


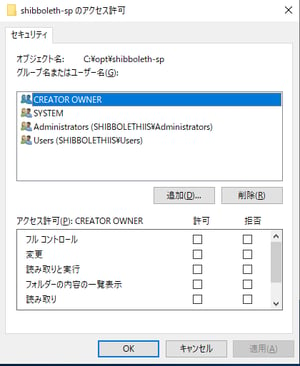
「追加」ボタンを押下し、IIS_IUSRSを追加します。


20190705_5


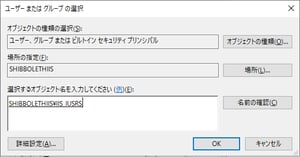
IIS_IUSRSにフルコントロールを許可します。


20190705_6


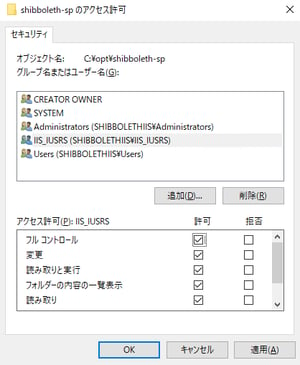
「OK」ボタンを押下して設定を反映させます。


インターネットインフォメーション サービス(IIS) マネージャーを起動します。


20190705_7


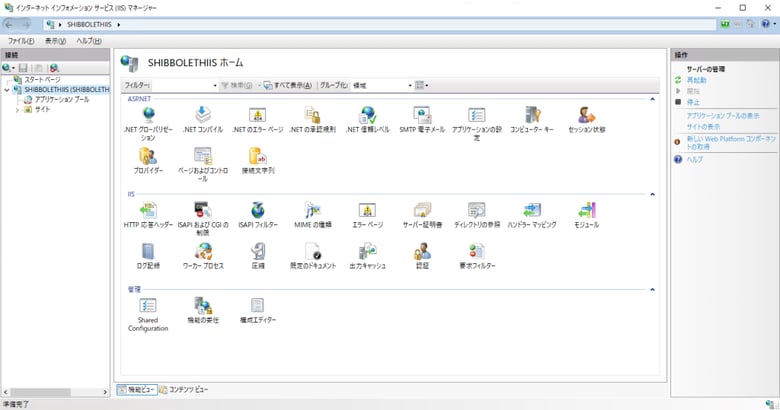
左ペインの「サイト」を展開し、「Default Web Site」を選択します。


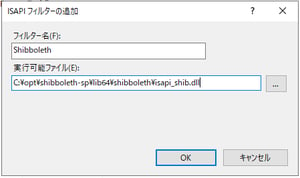
右ペインから「ISAPIフィルター」を選択し、「追加」を行います。


フィルター名に「Shibboleth」、実行可能ファイルに「C:\opt\shibboleth-sp\lib64\shibboleth\isapi_shib.dll」を設定し、OKボタンを押下します。


20190705_8


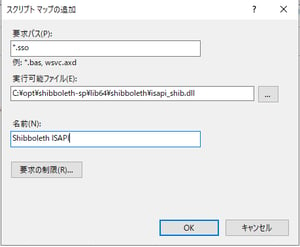
再度、左ペインから「Default Web Site」を選択し、右ペインから「ハンドラーマッピング」を選択します。

「スクリプト マップの追加」を選択し、


要求パスに「*.sso」、実行可能ファイル「C:\opt\shibboleth-sp\lib64\shibboleth\isapi_shib.dll」、名前に「Shibboleth ISAPI」を設定し、OKボタンを押下します。


20190705_9


認証後に表示するサンプルコンテンツを作成します。


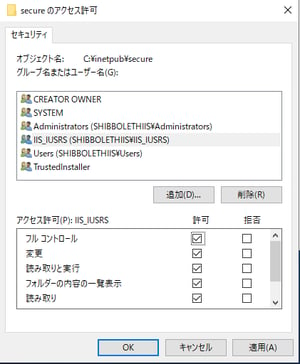
C:\inetpub に secure というディレクトリを作成し、IIS_IUSRS にフルコントロールの権限を付与します。


20190705_10


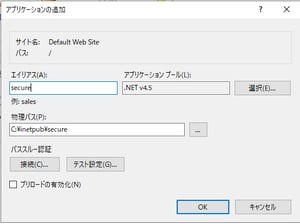
secureフォルダーをアプリケーションを追加します。


「Default Web Site」のコンテキストメニューからアプリケーションの追加を選択し、以下のようなアプリケーションを追加します。


エイリアス:secure
アプリケーションプール:.NET v4.5
物理パス:C:\inetpub\secure


20190705_11


「Default Web Site」を選択し。IISを再起動します。


これでShibboleth-SPの設定は終了です。


以下のURLに接続し、正常に稼働しているか確認してください。

https://shibbolethiis.int.secioss.work/Shibboleth.sso/Status


正常に稼働している場合、以下のようなXMLが返ります。


最後のStatusタグの内容がOKなら正常です。

        <?xml version="1.0" encoding="UTF-8"?>
<StatusHandler time="2019-07-01T05:52:30Z">
  <Version Shibboleth="3.0.4" OpenSAML-C="3.0.1" XML-Security-C="2.0.2" XML-Tooling-C="3.0.4" Xerces-C="3.2.2" />
  <Windows memory="2046M" cpucount="2" producttype="Server" build="9200" version="6.2" />
  <SessionCache>
    <OK />
  </SessionCache>
  <Application id="default" entityID="https://win2019.int.secioss.work/shibboleth" />
  <MetadataProvider lastUpdate="2019-07-01T05:41:04Z" source="C:/opt/shibboleth-sp/etc/shibboleth/SlinkMetadata.xml" />
  <Handlers>
    <Handler Binding="urn:oasis:names:tc:SAML:2.0:bindings:SOAP" Location="/Artifact/SOAP" type="ArtifactResolutionService" />
    <Handler Binding="urn:oasis:names:tc:SAML:2.0:bindings:HTTP-POST" Location="/SAML2/POST" type="AssertionConsumerService" />
    <Handler Binding="urn:oasis:names:tc:SAML:2.0:bindings:HTTP-POST-SimpleSign" Location="/SAML2/POST-SimpleSign" type="AssertionConsumerService" />
    <Handler Binding="urn:oasis:names:tc:SAML:2.0:bindings:HTTP-Artifact" Location="/SAML2/Artifact" type="AssertionConsumerService" />
    <Handler Binding="urn:oasis:names:tc:SAML:2.0:bindings:PAOS" Location="/SAML2/ECP" type="AssertionConsumerService" />
    <Handler Location="/Login" type="SessionInitiator" />
    <Handler Binding="urn:oasis:names:tc:SAML:2.0:bindings:SOAP" Location="/SLO/SOAP" type="SingleLogoutService" />
    <Handler Binding="urn:oasis:names:tc:SAML:2.0:bindings:HTTP-Redirect" Location="/SLO/Redirect" type="SingleLogoutService" />
    <Handler Binding="urn:oasis:names:tc:SAML:2.0:bindings:HTTP-POST" Location="/SLO/POST" type="SingleLogoutService" />
    <Handler Binding="urn:oasis:names:tc:SAML:2.0:bindings:HTTP-Artifact" Location="/SLO/Artifact" type="SingleLogoutService" />
    <Handler Location="/Logout" type="LogoutInitiator" />
    <Handler Location="/Logout/Admin" type="LogoutInitiator" />
    <Handler Location="/Metadata" type="MetadataGenerator" />
    <Handler Location="/Status" type="Status" />
    <Handler Location="/Session" type="Session" />
    <Handler Location="/DiscoFeed" type="DiscoveryFeed" />
  </Handlers>
  <md:KeyDescriptor xmlns:md="urn:oasis:names:tc:SAML:2.0:metadata" use="signing">
    <ds:KeyInfo xmlns:ds="http://www.w3.org/2000/09/xmldsig#">
      <ds:KeyName>win2019</ds:KeyName>
      <ds:X509Data>
        <ds:X509SubjectName>CN=win2019</ds:X509SubjectName>
        <ds:X509Certificate>MIID5zCCAk+gAwIBAgIULrmGe+APQ6K/U0mYMT7TNPALxpswDQYJKoZIhvcNAQEL BQAwEjEQMA4GA1UEAxMHd2luMjAxOTAeFw0xOTA2MjcwMDUyMDJaFw0yOTA2MjQw MDUyMDJaMBIxEDAOBgNVBAMTB3dpbjIwMTkwggGiMA0GCSqGSIb3DQEBAQUAA4IB jwAwggGKAoIBgQCUseqn4WldPmYWvXLpVeQHS10M92wp4QkJUeScW77epw7lBZbe GiRxq82KGrSPgmc+WnpqPFZOqeTt06KfXd+lc/k6bTMiL5PhLyg6Jq1xiiGFdoUH Jn3ni55PZw5XIJPpFsscT+AFWZQyxkxZ5Yw79Q8Hle5VEv5UIaRYTNAqhcA28JG6 n9bPVmdpYp5RT24ruIQSdk3QlzFmSzu5YOIFKIS9YiLX3yF14Eb++vC1AXbpzvI+ t3wIVzJDIr/MQXGf/8elErNlN8uuflvhmPPK59dDLpPHFi7vDU3/YwpnyhMf61cW +N4OgK2QEBbkO678DdjtMht8t05NwbKhRiafgmUk+XBy+6GSiQt1PQ8hiYAXONp2 ZlQfl5OOowPflv3RfQ3jX6AQ8BJcvDzsjuFYs31fIkL1MACvFOOalxscQTe8brXC gYddVvfQiuaf7EO6IqQY1oFS6RlRAQSy4pbCnLVU5e3zcDyBO7E9H0ucOhdVJTB6 WUMj/7/4h/jboHECAwEAAaM1MDMwEgYDVR0RBAswCYIHd2luMjAxOTAdBgNVHQ4E FgQUnHrnOlKgc6mcsGaFCdfVBvyvltIwDQYJKoZIhvcNAQELBQADggGBAAsWualx OkyxXTa+lOCPogEtkrCzDZBeXdDt7pQyMgRtTLomYPVv6tGE6Vs/9bWq39jZ9R04 pi38XC36sY6zscoVB6FhXx1577pJ/UL5WoC/me51dryvaNimT/Rk4wl1d2/pFL5X 4Y7Hd2dTHHCHtPBns9SyUL+nUJZa5aSsRe07+clqX6zrpUIaF9mbxGrevSOkf/1r zeHMq8LBmokx3aMhNQYNxR+1PmUxtG2lZHBBVvnnRhNxnRrTNJAYV3cmQkUh/6Mg cOU7FCZcFFo1OURhrKNFUAu2bHqyy7gGaOMqgkx1KmVAnEbyruI5ZuW6r95Co0ax z+1DtstssxYK5ELRy5ltCDQX6IFna0uHeTX9CHTEXYVG7TuQwpQ1m65cUrdwOSMs mIrvAPDdEeYOBZrCobbCWLWIhFxo7d403vYIhXy06/VWfTwUZJtf0HWFMtFWAJpx lu5bA3TbFyuGY+5TPjtoKc7tBONdSaWw8nj/ZCYdoIXrbtyWVRFznFffqg==</ds:X509Certificate>
      </ds:X509Data>
    </ds:KeyInfo>
  </md:KeyDescriptor>
  <md:KeyDescriptor xmlns:md="urn:oasis:names:tc:SAML:2.0:metadata" use="encryption">
    <ds:KeyInfo xmlns:ds="http://www.w3.org/2000/09/xmldsig#">
      <ds:KeyName>win2019</ds:KeyName>
      <ds:X509Data>
        <ds:X509SubjectName>CN=win2019</ds:X509SubjectName>
        <ds:X509Certificate>MIID5zCCAk+gAwIBAgIUTAxZSWy4SQd+JpltvaN2p41xMSMwDQYJKoZIhvcNAQEL BQAwEjEQMA4GA1UEAxMHd2luMjAxOTAeFw0xOTA2MjcwMDUyMDBaFw0yOTA2MjQw MDUyMDBaMBIxEDAOBgNVBAMTB3dpbjIwMTkwggGiMA0GCSqGSIb3DQEBAQUAA4IB jwAwggGKAoIBgQDfb5Tw9//YUTdRch5c77QeUipsRMbtJAjq4XYBJoVMzuJAMppv 1Dhlx6leA177rd0n8gKnoddYCeWan0VgRT9PYjOjJdqHUCpgEDf2YeTj/YYM52jA C9OEnVndI81dx3VAiULO4E6j3hfaJ0lmIraE6XUsH22TqZGLICdC2CJfYSN16NWd g/QxrjvZwt4ti5UI02G6rXQd2Cu9C/kiEykKslL3QdQj3Fd9h+PdYcK2CaO2a0J3 Y+Nd1PYOkhiftQ5MOie5N4f7o94n0GVwO2oWBRORLaytrUgKjZkb3OsPRhWU+nSF 2b8dD+lTwOhgEDProWAv1t0kLfIoa/TUUp4PIEjT/El2TxYn+629kWkeYxDqEn6K H76DEZYbhQtU1Uf/qYbziKjCToEC8DHotYJ+j2CoELe7Sqc6ieC6MHLep1dL7ly/ bnxmH9cRLvnZ8tqIP/cHuUesjHrrtfxYztn7X9qTnbmQsM3CsuLhqEypw5r82cIO XwJvPe4pi236c1UCAwEAAaM1MDMwEgYDVR0RBAswCYIHd2luMjAxOTAdBgNVHQ4E FgQU0cTympJaPBPNFkgSOgnc81PxAd4wDQYJKoZIhvcNAQELBQADggGBALRk4L+4 GvLl/lOvzRvoy+D/8Y9IalbooJ5v+8fNrN0KDrubuYVGmyjF/vMCBS0ymm8weRd0 BtuczydfHyaVOlYV7Grxmdb8eMwj1JZDaZZo8hyLqhPPDi+VF58FcWhVkalQttMn k3ay72ooKCBxluWv/AvMYgtzBl02nFjZ+Cz1+T7oFhtOG4FwWo/dFlNE9Li6FjAU 5/yM4HTwJVFR5QSj3cXOjwRrNVCkwh4ik6cuXmuhgAfyDZ23EjVYDQ2GwFp+/qwU 8grFciiVKSRp2+SVCH9INC4DumJcYeUPUSTCpj/4ubEQ5awEHIi5dEyxtCzYD2wK AGvEoT2zZscy6jHFhWRI08C/pvFL8Mqtek+g5WJbsNRHKo7wCGRCiuM50llZbKFu MiaxUcki32K3TS7cJiDacy6dca90+UPq634CFHr+In/aQqvxzWuzTMjdPcgBNfof 6wdLL4cCcNgWoa8X8JocVjTJHxdTdkr832ejPC97L3Uoz5E0L6bab2PDnQ==</ds:X509Certificate>
      </ds:X509Data>
    </ds:KeyInfo>
  </md:KeyDescriptor>
  <Status>
    <OK />
  </Status>
</StatusHandler>


5.SeciossLinkの設定

以下のURLにアクセスしてShibboleth SPのメタデータをダウンロードします。


https://shibbolethiis.int.secioss.work/Shibboleth.sso/Metadata


SeciossLinkの管理画面にログインし、SAML SPの新規登録を行います。


まず、「メタデータ」のファイル参照ボタンで、さきほどダウンロードしたShibboleth SPのメタデータを選択し、読み込みボタンを押します。


20190705_12


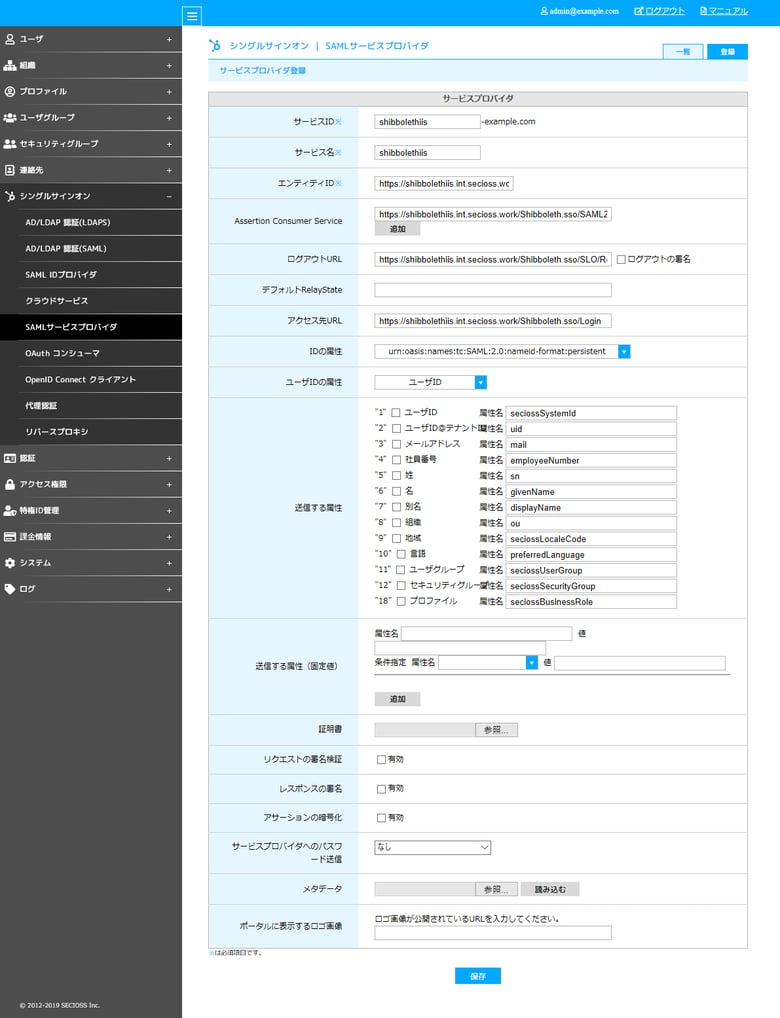
メタデータの読み込みを行った後、以下の項目を追加で入力します。


項目名

設定値

サービスID shibbolethiis ※任意の値
サービス名 shibbolethiis ※任意の値
アクセス先URL https://shibbolethiis.int.secioss.work/secure/
※サンプルページのURLを設定します


保存ボタンを押下し、設定を保存します。


登録したSAML SPをユーザーに割り当てます。


20190705_13


6.動作確認

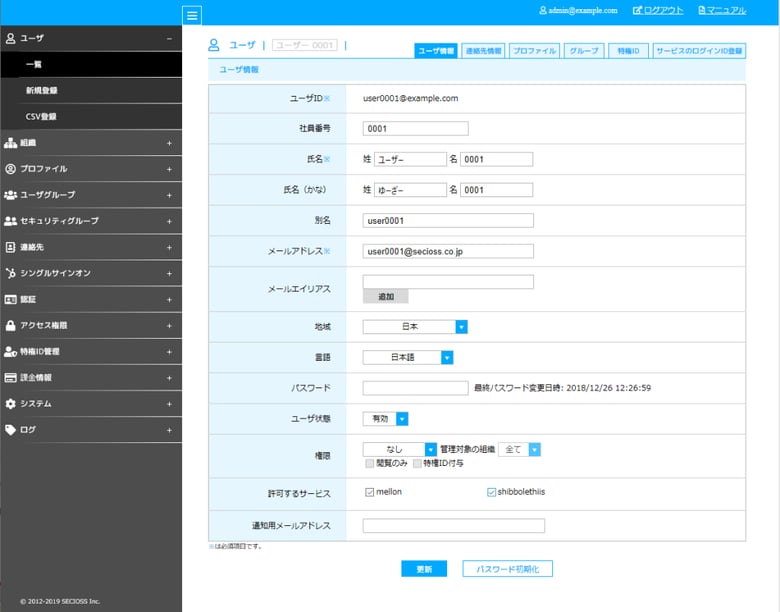
以下のような C:\inetpub\secure\Default.aspx を作成します。


SAML認証したユーザIDとサーバー変数の一覧を表示するだけの簡単なサンプルです。

        <%@ Page Language="C#" Debug="true" %>
<%@ Import Namespace="System" %>

<script language="C#" runat="server">
  protected void Page_Load(object sender, EventArgs e){
    UserID.Text += HttpContext.Current.User.Identity.Name;

    string text = "";
    foreach (string key in HttpContext.Current.Request.ServerVariables.AllKeys) {
      text += "<div>" + key + ":" + HttpContext.Current.Request.ServerVariables[key].ToString() + "</div>";
    }
    
    ServerVariables.Text = text;
  }
</script>
<HTML>
<BODY>
  [User]<br><br>
  <div><asp:Label runat="server" id="UserID" /></div>
  [ServerVariables]<br><br>
  <div><asp:Label runat="server" id="ServerVariables" /></div>
</BODY>
</HTML>


以下のURLにアクセスします。


https://shibbolethiis.int.secioss.work/secure/


SeciossLinkのログイン画面にリダイレクトされますので、SeciossLinkで認証すると以下のようなサンプルページが表示されます。


20190705_14


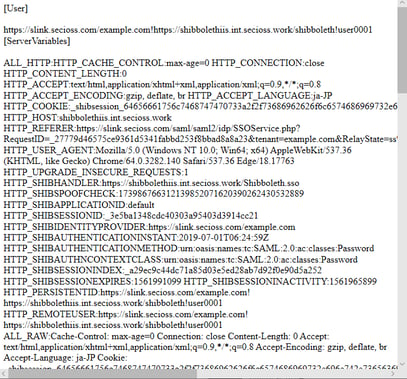
Shibbolethのデフォルト設定ではユーザーIDが <IdPのEntityID>!<SPのEntityID>!<ユーザーID> のフォーマットで保存されます。


Shibbolethでの認証情報は ServerVariables に保存されています。


このようにShibbolethを使うとIIS上のASP.NETアプリケーションも簡単にSAML対応できます。

それではまた。


SeciossLinkは、Shibboleth SP for IISを使用してSAMLに対応したASP.NETアプリケーションとシングルサインオン連携が可能です。

ユーザーが安全にサービスプロバイダーへアクセスできるため、ぜひ一度お試しください。